
Invoice capture allows you to scan invoices as they arrive, extract vital data, and pair invoices with purchase orders.
Entering invoices into your financial system can be a time-consuming process that leads to data errors, as accounting clerks must use several windows and attachment files to manually capture the right information. The invoice capture feature in public preview, available out-of-the-box for Dynamics 365 Finance, automates Accounts Payable (AP) invoice processing so you can work more accurately and efficiently. Use invoice capture to scan and read invoices as they come in, and the system will match the data to existing purchase orders, identify exceptions and errors, and update your financial records.
Invoice capture provides end-to-end AP invoice automation from prepayment application through invoice posting and payment. Its modern user interface and custom invoice processing model is powered by the Microsoft Power Platform, AI Builder, and Azure Form Recognizer.
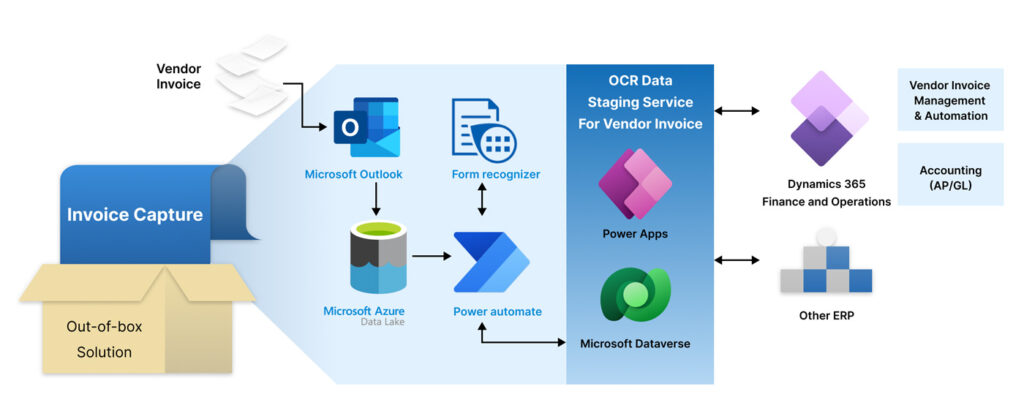
Image by Microsoft via: https://learn.microsoft.com/en-us/dynamics365/finance/accounts-payable/invoice-capture-overview
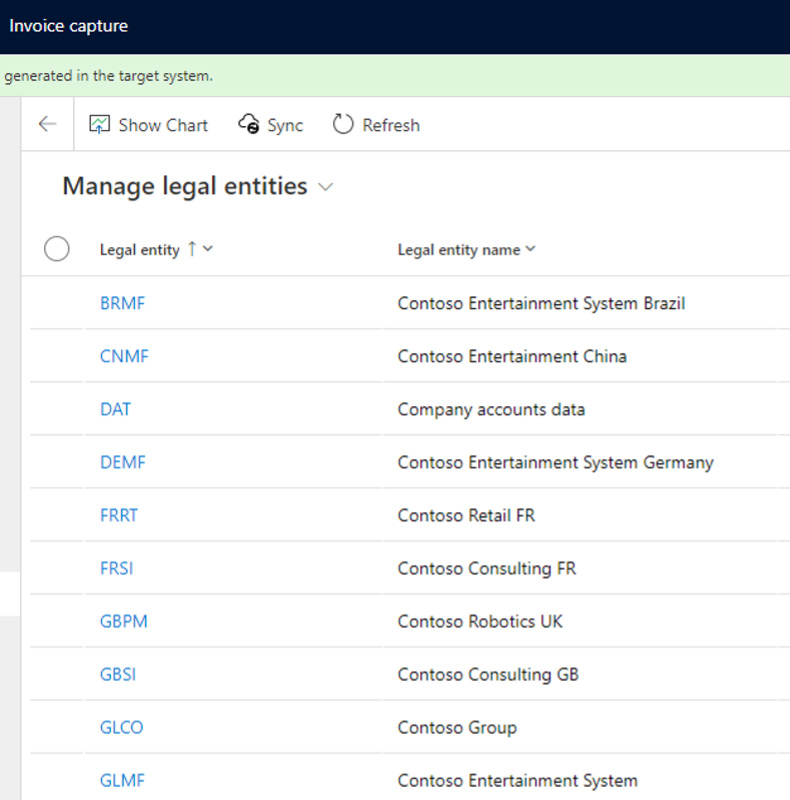
1. Synchronize your legal entities
To get started with invoice capture, you must first build the organization structure by synchronizing your legal entities from Dynamics 365 Finance to the Power Platform. You can also the Power Platform to define mapping rules for things like legal entities, vendor accounts, items, expense types, and more.
2. Define your channels
Next, your system admin must first define the channels by which your organization will receive invoices. Generally, the channels will look something like email in Outlook, file servers such as OneDrive and SharePoint, and any other connected APIs that allow for file upload. Once your channels are defined, you are ready to receive invoices from your vendors with invoice capture.

3. Automate invoice detection
When an invoice is received, it will be automatically detected by the invoice capture tool. You can centrally monitor the status of the invoice document as it is processed in the Power Platform (Dataverse). After the invoice is validated, the AI Builder will perform OCR recognition to prepare the invoice for the data staging phase. For documents where the automated recognition fails, you will be prompted to manually review and confirm the data.
If no errors are found, the invoice will be automatically transferred without manual review.

4. Manually review and transfer an invoice
If an imported invoice needs manual review, you can take advantage of the side-by-side viewer feature. In the side-by-side viewer, the document header will display an imported status, and the current version will display its original version.
To begin reviewing an invoice, pick View captured invoice from the top navigation. In the Messages pane, you will see a list of any errors that may have occurred where automated data detection was unsuccessful (e.g., a low-resolution invoice render). Use the following key to determine level of alert:
- Error messages are shown with a red X
- Warning messages are specified with a triangle
- Informational messages are a circle
Click on Start review in the top navigation. If a field’s value is discovered from the original invoice via the optical character recognition (OCR), a symbol will appear on the field. If you click the symbol, the document viewer will increase to highlight the location of the field value, helping you authenticate invoice data.
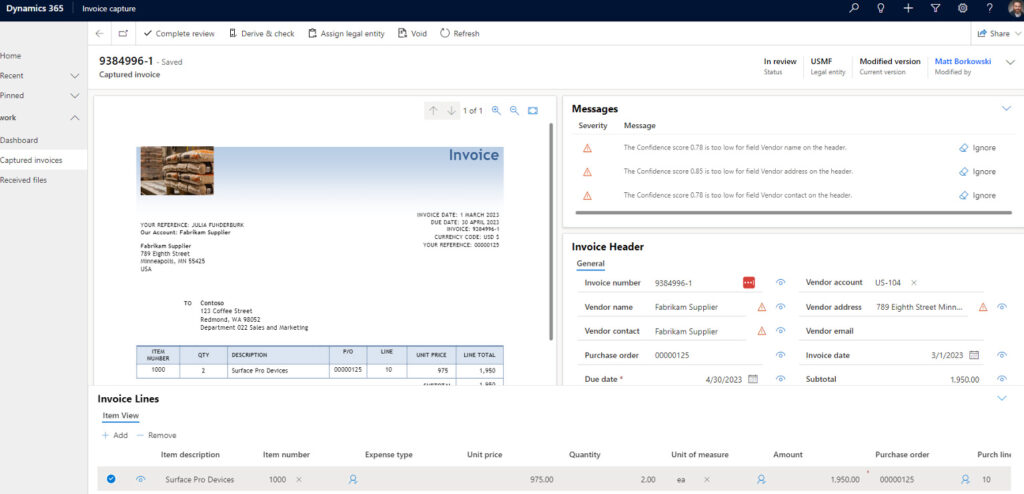
As corrections need to be made, you can manually edit any field as needed. Corrections are automatically saved when the cursor moves from a field. A symbol to the right of a field signifies that the field has been updated. Refreshing the page removes the symbol. Once you’re happy with all the fields, you can click Complete review. If any errors are discovered, the document status stays in review, displaying a message bar. Any messages in the invoice header and message pane are automatically updated to give information on the reasons for the unsuccessful validation.
If all errors have been addressed, the review status will change to complete. You can now click Transfer invoice to push the invoice into Dynamics 365 Finance.
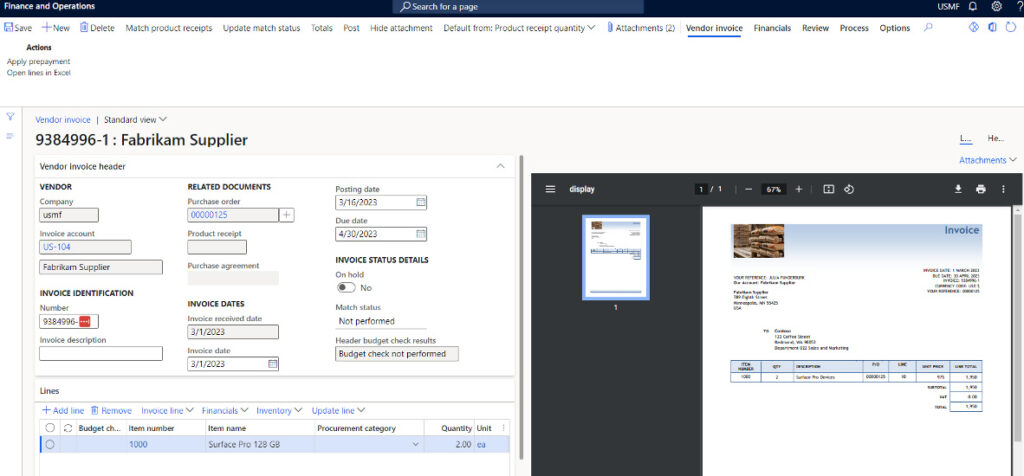
5. Review and approve in Dynamics 365 Finance
After the invoice has been transferred to Dynamics 365 Finance, it will appear in the Vendor Invoice list page in the Accounts Payable module. Here, you’ll see a list of the pending vendor invoices that were successfully imported from invoice capture.
This concludes how to use invoice capture to accelerate your invoice-to-pay process for Dynamics 365 Finance. At Arctic IT, it’s our mission to help businesses like yours automate their processes to increase data accuracy and save time. If you’re ready to team up with a partner who can help you take your business workflows to the next level, connect with us today.

By Matt Borkowski, Principal Solution Architect ERP at Arctic IT